When I began following the computer security expert Bruce Schneier , in one of his talks he said that every device that is connected to the Internet is unsafe. When the host asked him to elaborate further on this topic he simply said that the safest computer in the world is the one that is not connected to the Internet.
This is the equivalent of saying that the safest airplane is the one that is not flying at all.
I agree with Bruce’s statements but my point is that, if we buy a device because we need it for work or leasure, we should do our best in making it more secure when it accesses the Internet.
The network attached storage that I have been describing in a previous post is a device that can help home and small business users accomplish several things, such as backing up pcs and MACs, storing and retrieving files locally and in the cloud, and streaming video and music.
However, the exposure that this server has to the local network and to the Internet makes it a vulnerable device that shares the same issues of the computers it stores the data from.
In this article, I would like to give my best tips on how far I could go on securing the server. I personally like and recommend Synology NAS servers for their clean interface, robust hardware and minimal consumption.
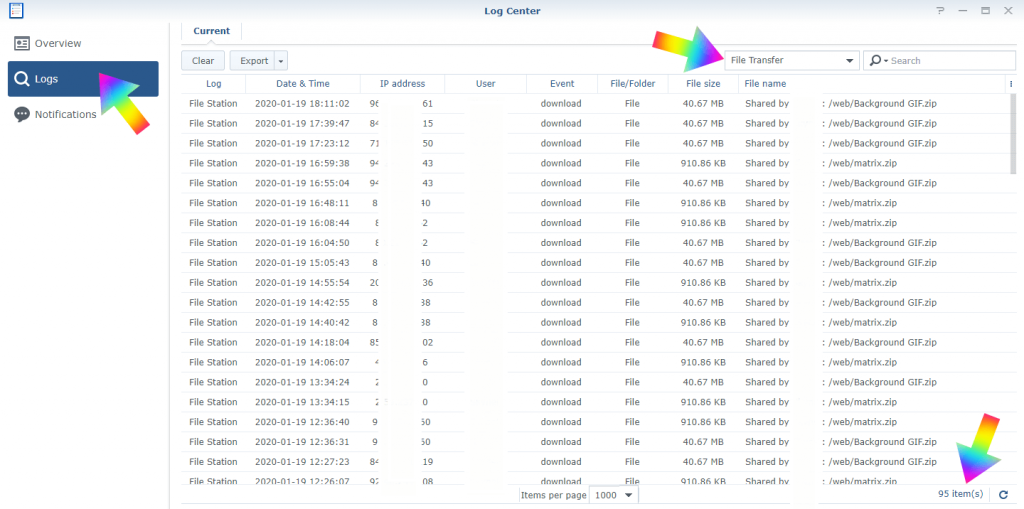
1- DOWNLOAD AND KEEP TRACK OF THE LOG CENTER APP
- On the main interface of your Synology Nas, after you have logged in with your admin account, go to the Package Center, search for the Log Center app and download it. Move the app to the main screen so that it will be always in front of you. The Log Center app provides invaluable information and it records all users logins, time stamps, types of devices logged in and IP address provenance, as per picture below. Log Center also records when apps get updated by admins and when the NAS is turned off and back on. One of the most dangerous attempted login by hackers is the constant use of the usernames admin, ftp and user. As I have recently tweeted about hackers trying to get control of Windows Servers, never and ever use very common words for your admin account.
2- USE A REPUTABLE DDNS PROVIDER FOR EXTERNAL ACCESS
- To be accessible from the Internet, the NAS needs to have a domain and be linked to a dynamic DNS server. Although there are multiple DDNS providers such as NOIP and other companies, I personally prefer to use the Synology DDNS server because a great security feature that it has is that at the moment of the setup, Synology asks to register your device via the serial number of the appliance. This is a good antitampering security feature that Synology offers for free and it should not be skipped. To setup the external access, go to Control Panel, External Access and click on the DDNS tab.
3- USE MORE THAN ONE ADMIN ACCOUNT AND SET UP PERMISSIONS
- Since the server has lock out features, it is recommended to create a couple of admin accounts with the same permissions. Furthermore, if your nas has more than 2 users, you may want to consider to create standard users accounts and setup folders permissions for those who will use the server. As one of the main IT commandments is Zero trust, you may want to grant access only to the resources that are really needed. A standard user should have permission based access to the server ‘s files and folders but also to the apps that will be used.
4- IMPLEMENT ALL THE FEATURES OFFERED BY THE SECURITY APP IN THE CONTROL PANEL
- The security section in the control panel has many features that should be read carefully and then implemented. For example:
a) The browser logout time can kick users out after a preset time, which is good if user for example leaves temporarily his/her desk.
b) The firewall section is very minimal but it should be checked by default, including the firewall notifications.

c) The protection feature is one of the main security features of this server, in that it allows admins autoblock IP Addresses after a preset number of attempts within a preset number of minutes. The allow block list allows administrators to white or black list ip addresses as well. As we currently live in a world where Denial of Services DDOS attacks are booming every day, the Synology server has also a built-in DOS protection that you may just want to leave checked.
5- ENABLE MULTIFACTOR AUTHENTICATION FOR LOGINS
- This feature is located in the account tab as in the image above and I believe it is an essential element of our daily routine. By enabling and enforcing the two factor authentication, users are forced to use and added layer of security after having used username and password. In addition, Synology made the extra mile by providing in the App Store and in Google Play the apps for an easy download on smartphones.
By enabling access based only on permissions and by hardening the security features of the nas, the server can notify admin if there are unauthorized attempted logins and provide a secure environment for those who need to handle mission critical operations and for users who are usually unaware of the risks that Internet-based devices offer.