Microsoft Word and Outlook are the most popular and widely used programs, but how well do we know them? Do we know Outlook’s advanced features, and how far our knowledge can go to get the most out of the most popular email program?
This article will list the main features that can be used in our daily use of Outlook’s desktop version, with the warning that these features are present in the Windows version of Outlook and may be curtailed if you use Outlook on a MAC.
1- INSERT A POLL
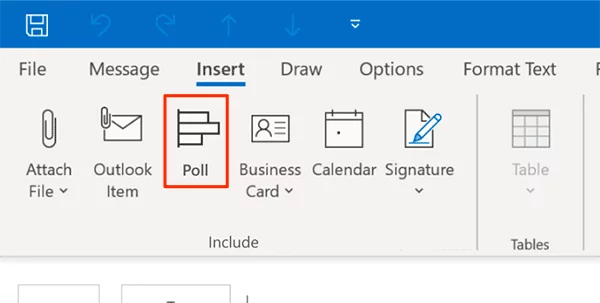
This new feature was introduced by Microsoft in 2018. To insert a poll, you would need to open a new email message. Then go up to the ribbon and click on new email; once a new email message appears, you can insert a poll by going to the top ribbon and click on insert poll. This opens up a pane on the right hand side where I can enter a question and then I could type a few different options. You can even add more options if you need to. After you have completed your questions, you can toggle a button that allows the poll to be more comprehensive by giving multiple answers. Once you are done typing your question(s) and providing the answer(s), you can click on insert poll in your email. The email will contain a link to the poll that the recipient will receive. Once the recipient clicks on the link, a browser window will open displaying the main question and the different available answers. Recipient can also insert his/her email to see the results page and how the other users responded.
2- DISTRIBUTION LIST
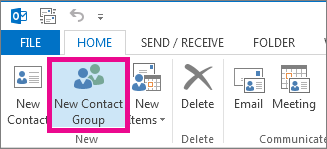
You don’t need to be a Microsoft 365 admin to setup a distribution list. If you email only a certain number of emails addresses, you may want to gather those individual addresses into distribution groups. To set up a distribution list you can head down to the bottom left-hand corner and click on the people icon. In the top left-hand corner, you have the option to create a new contact group. After clicking on this option, a window opens where you can create your own distribution group. Type the name of the group you want to create. To add members to the group, you may want to skip adding each individual email. What you can do instead is to go back to the top, in the ribbon, and add members from the address book. Click on save and close to save the newly created group. To send an email to the group, open outlook again, click on new email and type the name of your new group.
3- TURN ON DARK MODE

You can turn on dark mode in Microsoft outlook to create less strain on your eyes. To turn on dark mode go to the top left hand corner and click on the file menu; within file, go down to office account and within office account about midway down you can select your office theme. By default, the theme is set to colorful. Click on the theme selection and set it to dark gray which makes the experience a little bit darker. If you prefer, you can also go to black if you want to make it as dark as possible. One thing to note when you turn on dark mode is that the feature will turn on dark mode in all the other Microsoft applications such as Word, Power Point and Excel. Once you are on dark mode, you can use a mixed approach when writing an email; on the ribbon, on the top right, you can switch the background of the email. Basically, that button allows to replace the dark background of your email body from black to white.
4- CREATE AND INSERT SIGNATURE
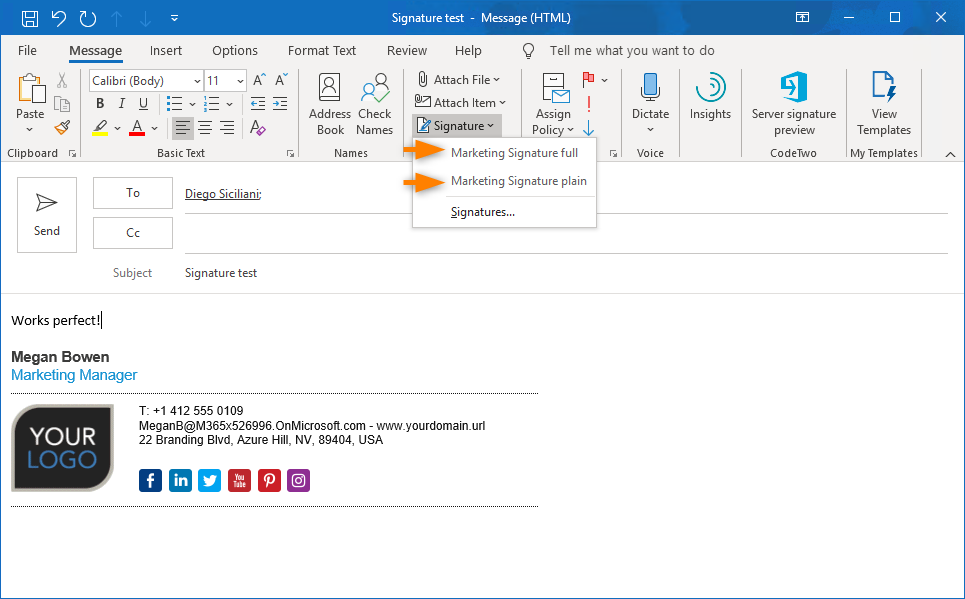
If you run or work in a business environment, you may consider using a signature at the bottom of your emails so that recipients will easily find your contact name next time they have to communicate with you. To insert a signature, click on a new email, go to the ribbon on the top and find insert and insert the signature. The signatures and stationary dialog come up. You can now create a new signature by clicking on new and give your new signature a name once you have filled out the required fields. On the right side, you can choose to which email account the signature will be applied to. You can also tweak the frequency of the signature by applying it to a new message and or to the replies and forwarded messages. You can create cool signatures by styling the fonts and the logo images that go with your signature so that all can look nice. My personal way to create a signature is by using a Word file where I can create a table first, remove the table edges and then insert the image on the left and text with links on the right of the table.
5- INSERT QUICK PARTS
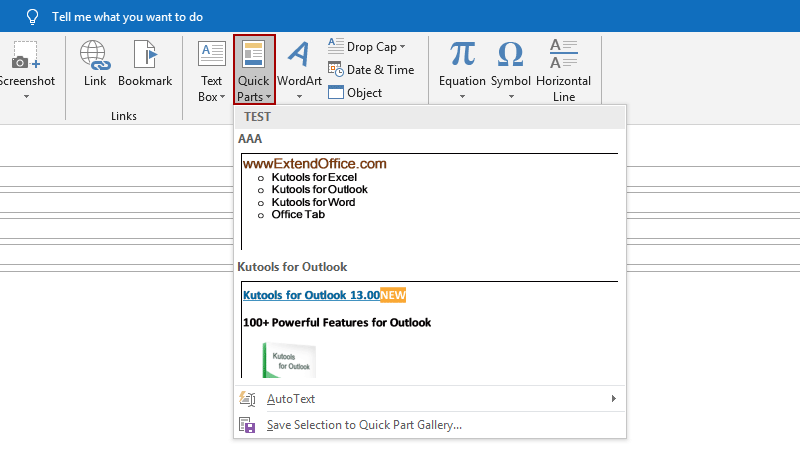
This Outlook feature helps saving time when you need to send the same text or parts of a text to different recipients. To use a quick part, first open a new email and copy and past the text you will send in the future to others. Let’s say you want to send instruction to someone and then the same instructions can be used by another person. You can automate the task by copying and paste the text only once and highlight it. Go then to insert and on the right, you can find quick part where you can save the selected text for future reference and giving it a name. More specifically, you have the option to save the selection to the quick part gallery and give it the name you wish. If you need to insert the saved text again, you can simply repeat the same process you have used to save the text. Create a new email, go to insert and on the right side click on quick parts. You can use this tip for any type of pre-formatted text that you want to insert into an email.
6- TURNING OFF EMAIL SOUND
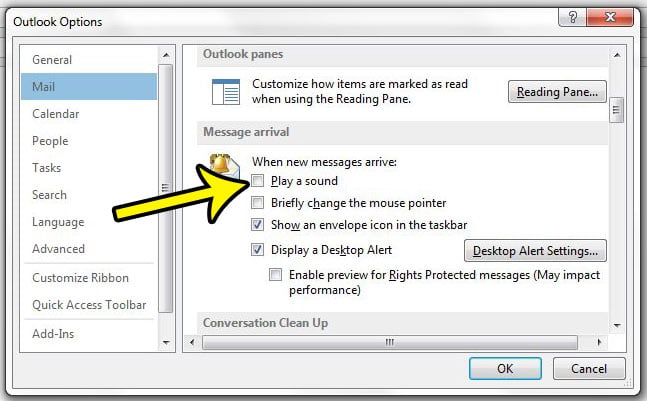
One of the most annoying features in Outlook is when new emails arrive and you hear a sound. Suddenly your mouse cursor changes, and you also get a pop-up notification from windows. Did you know that you can turn that off? To turn it off the sound notification go up to the file menu and then go down to options; within options click on mail and all the way down there’s a section called message arrival. You can turn off play a sound and every time a new email arrives in your mailbox, you won’t hear any sound.
7- CREATE EMAIL RULES
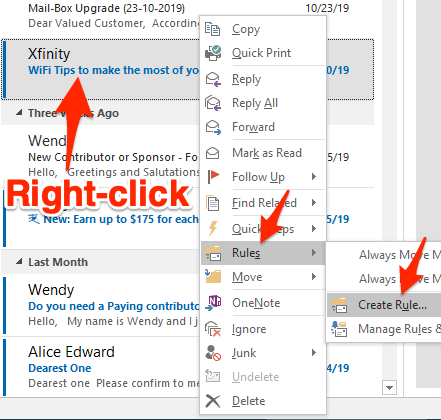
If you are dealing with many emails on a daily basis you may want to cluster them in folders and have them delivered to the folder you have just created next time that the email will be delivered to your inbox. In order to activate the rule for the messages you want to group together, you can right click on one of the messages and select rules, create rule. You can customize the rule by setting up conditions to the rules. For example, you can apply the rule if the message comes from a specific sender or if they have specific keyboards in the subject. Once you have customized the rule, the rule will send the messages to the folder you have selected for the email delivery and will run against all the other messages prior to the creation of the rule.
8- CREATE A CALENDAR INVITE FROM AN EMAIL
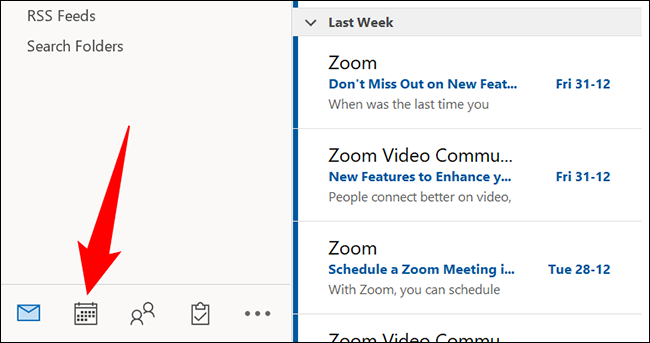
This feature is very cool in that it allows users to go to the calendar directly from the inbox. Rather than opening an email and another outlook window for the calendar, the two tasks can be merged into one by dragging the email into the calendar icon located at the bottom left so that the calendar invite will show up right away.
Outlook is a powerful email service that goes beyond organizing emails, calendars and contacts. Outlook can integrate with its peers such as Word, Excel, and PowerPoint and even Teams for seamless collaboration on projects, no matter where you are or what device you’re using. It can also store all the customization users implemented to save time when timing is of the essence.